Hibiscus Of Tahiti
HYBRIDIZING
Selection Of Pollen Parents:
Mechanics Of Pollination:
Harvest Of Pods:
Pod Processing:
Distribution Of Seed:
The production of tropical hibiscus seed in quantity, even or especially in an idea climate such as that of Tahiti, entails a great deal more than perhaps meets the eye. Generally I spend about 2 to 3 hours per day, missing very few, pollinating blooms and harvesting seed pods. Following my routine as below, you will be able to understand not only the effort spent in producing seed, but you will learn the simple but basic procedures, methods and tools used in hyridizing so that you can do so yourselves with your own plants.
I first tour all the open blooms around 9:00 am which provides enough time for most of the blooms to have opened. I then select those I want to use as pollen parents, which to a degree depends on which ones have produced an adequate amount of pollen. I frequently use second day blooms for this purpose, especially for those where the pollen dehisces "opens" in late morning or afternoon. Even in our ambient temperatures the pollen seems to be just as viable on the second day, with some exceptions. For certain cvs, the pollen viability is short, meaning that it dries out sometimes after only a few hours once dehisced. For these varieties, I will store them in the refrigerators, just after the pollen dehisces and take them out the next morning to use as a pollen parent. In addition to having adequate pollen, parents are selected on the basis of many different criteria:
1) In trying to improve on existing colors combinations, I often pollinate blooms of the same color group, pattern type, etc.
2) In trying to find surprise combinations, I will often mate parents to get the greatest diversity.
3) In trying to get certain bloom characteristics, i.e., white rims, or maybe ruffling and tufting, I will select appropriate parents.
4) Likewise for texture and bush characteristics, i.e., I try to find a pollen parent that will compliment or improve upon those qualities in the pod parent.
5) In many cases, I pollinate just to get seed to provide to seed banks so that beginners will have something to learn with. Remember, that even some of the most unlikely combinations, since modern hybrids have such a diverse gene pool, will have the potential to produce quality seedlings.
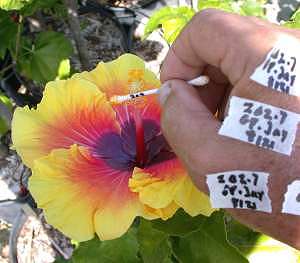
Although I sometimes use a bloom, carrying it from one potential pod parent to another, placing its pollen on the pads, it is often a waste of that bloom which itself could serve as a pod parent. Moreover, carrying a number of blooms becomes a burden to be manipulated with the various hybridizing tools one must carry. The above, along with my digital camear, are the basic and simple tools of the trade: the garden log for entry of data, the camera for recording of blooms, the indelible felt pen and paper masking tape for labeling the pollinated blooms and labeling and wraping the harvested pods so that the seed doesn't fall out, and a container of "Q" tips to collect and apply the pollen. With cotton "Q" tips, each end of which can carry a good supply from one pollen parent, that makes two pollen parents per "Q" tip - one at each end. As I can carry three, one behind each ear and one in my mouth, that makes for the easy transport of 6 pollen parents. The pollen is first collected with the "Q" tip by rubbing or rolling it in the the pollen which allow the pollen to adhere to the cotton tips. Then the pollen on the end of the "Q" tip is simply swabbed on the pads of the potential pollen parent. Once depleted, I return to the pollen parent and accumulate more pollen on the "Q" tip. I mark the "Q" tip support with the initial of each pollen parent so that I can keep them straight. Knowing I have 6 pollen parents, I pre mark the initials on the paper masking tape along with the date, tear them off and stick them on my arm. In this manner I can pollinate a bloom with the appropriate "Q" tip, remove the corresponding pre labeled tape and place in on the pollinated bloom. In this fashion I can pollinate a maximum number of blooms in short order. However, as there are always potential pods parents that need special pollen parents based on the desired results, there is always an extended period of time making these special crosses.
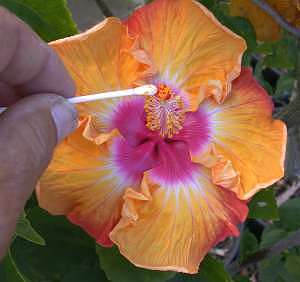
Left: Pollen being collected, by rolling the "Q" tip so that it adheres to the cotton tip - note the number of the pollen parent on the "Q" tip and the pre made lables with the intials of the pollent parent parentage (GP for Georgia's Pearl and Jay for Jayella) and date
Righ: Pollen being applied to the pads of the potential pod parent.
Pods will form and reach maturity under suitable conditions of temperature (60 to 90F) in about 6 weeks. However, one a percentage of flowers pollinated will produce pods. With some varieties know to be good seeders, the percentage can be high, while with other they may only very rarely set seed. If the flower drop at it connection point on the stem, the processes has been immediately aborted. If the bloom falls away leaving the caylix, one will generally see a small button like structure, the embryon seed pod, inside. It may continue to develop but can also aboard at most any stage. Some will go almost full term and fall off or even open with imature white seed inside. These if they turn brown may be viable but more often than not will shrivel.
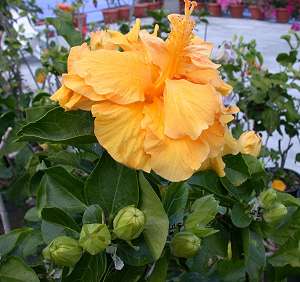
Left: Is a Rosalind seedling kept for its amazing floriferousness which has turned out to be an even better pod setter than Rosalind itself. It produce pods nearly 100% of the time for each pollination. Below the bloom can be seen pods in various stages of development, 1st and 3rd from left reasonably mature and 2nd just forming with many others in view as well.
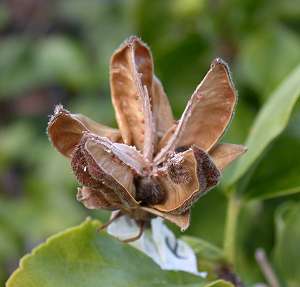
Right: a mature pod left on a different plant left too long with much of the seed having already fallen out and only a few left at the very base of each chamber.
While pollinating blooms I invariably run across ripe pods, although when I'm done with pollinating blooms I usually make a special round to search for mature pods. It seems that search as I may, I can return and invariably find pods that have been missed. One can mark branches to locate pods, but in my case, I do it in such quantity, perhaps a hundred or two blooms per day, that it simply seems easier to make thorough searches on a daily basis.
With an idellible felt pen, the end of the tape is marked with the name of the pod parent (if a seedling the cross number and parentage) and the date of harvest. The pod is then wrapped in such a manner as to prevent the seed from falling out, and the pod placed in my pocket.
At the beginning of the following week, the one week old seed is processed, meaning that it is removed from the pod and placed in a hermetically sealed zip lock bags with the date of pollination, date of harvest, pod and pollen parent and the number of seeds contained written on the outside of the bag. This is done at the rate of about 20 pods per hour. With an average week producing 75 to 150 pods, this takes roughly 3 to 8 hours to accomplish. It isn't as boring as watching paint dry, but except for the mental anticipation of what each cross might produce, it is a rather mundane and unrewarding job. After the weeks supply of harvested pods has been processed, the above information is entered in a data base in my computer at which time a cross number is written on each zip lock bag, trying to keep them in rough chronological order based on the harvest date. This takes another hour or two. If I let the pods pile up as happened last year, this can amount toa couple of weeks worth of 8 hours a day work to process the refrigerated pods. Once the seed is thoroughly dried by leaving the zip lock b
ags open for an additional week in ambient conditions, the bags are then zipped shut and the seed is placed in the refrigerator. Handled in this manner it appears that seed will last a very long time, perhaps a couple of years with vitality diminishing slowly over that period.
It takes one hour to remove the seed from 20 pods (on blue cover) and place inside and labe the zip lock bags (on red cover). The 3 bags of refrigerated seed in the large zip lock bags above, will require many 8 hour days to process.
In the past, I have simply given away thousands of seeds, which amounts to perhaps 98% of what I produce, growing only a selected approximately 2% myself. As the process of hybridization has become such a time consuming process and as hibiscus, at the rate I grown them, have become quite costly, I presently offer excess seed at a nominal cost on this website for connoisseurs to to select the best of what they might be looking for. Ideally, when I can maintain the rhythm, the seed availability list is updated at the beginning of each week. It will remain there for about a month or so. The older unsold seed, is then removed and sent to seed banks, that of the IHS having first priority. When there is an abundance of seed, it will also be supplied to the seed banks of the American and Australian Hibiscus Societies.
The adventure continues.